Tuesday, August 25, 2015

Done, but far from finished.

I am way behind on the blog. So allow me to back up a little.

I made the trailer bunks while the boat was upside down. The front bunk was an exact fit of the bow, my goal was for the boat to lock itself onto the trailer when the trailer winch was tightened and automatically aligning the back of the boat onto the trailer (it works fantastically well, and the boat is perfectly in place by just tightening the winch) . 

I used scaffold sections and a wood beam to lift the boat high enough to get the keel in.  (I would have liked to have gone up one more section), and had to tilt the boat a little to get the keel in, but it worked easy and I was able to just slide the trailer in and drop the boat onto it.


The launch party was awesome, with a bunch of friends and family there to celebrate with a little champagne, including a toast of Fosters, to our lost team mate and friend Roy Burley.  I will post a video of the festivities soon.


We are done, but far from finished, as we refine how the boat operates. The first couple of weeks were plagued by light air, but it enabled me to go thru everything on the boat and work on it's systems, so, when the wind finally came the 3rd week and the lake was white capping, I turned to my team mates (we are 3 up for now) who said , "hell yea, lets go", and go we did!.

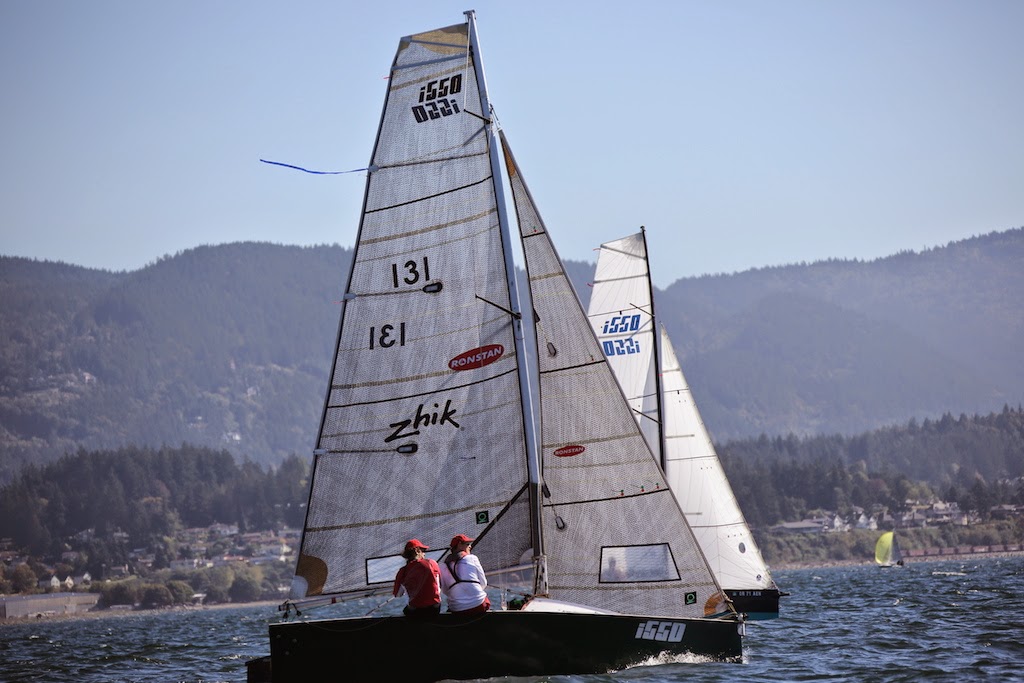
Down wind speeds were continuously in the 6-10 knot range according to the Velocitek Speed Puck, the wind had sadly lessened by the time we got out there, but the boat felt awesome and ready for greater speeds then the nearly 11 knots (10.8) boat speed we had achieved.

I plan to continue the blog and share how we are tuning the boat, our success and failures. To date I have lengthened the forestay a couple of inches, we had good boat speed upwind, topping out in the high 5's, but our pointing was not as good as it could be, installing a 2" stay extender appears to have fixed the problem. 
More to come!


Sunday, May 10, 2015

Planning on planing!

Progress has been difficult, with every thing going on right now, time has to be "created" just to get a few things done. 

The articulating pole is now operational. One of the things I really like that I did was to run the articulating pole controls into the cockpit just forward of where the traveler would be, my reasoning for this was that if we are planing, there would be no need for anyone to move forward from the back of the boat.

Everything except the VC Performance epoxy has been applied. The top and sides were sprayed with Interlux perfection and the grey Interlux "Interdeck" non-skid, was rolled on with a 1/4 nap epoxy roller. The grey really brings out the angles of the boat, I like the contrast.

Although I am still missing my upper spreader bracket (I had a hard time getting the right part) I needed the mast up, to get a few measurements for Tac Boston at Doyle/Boston sails, so that my sails can be finalized.  Next up: attach the keel/bulb together, VC Epoxy, and work on trailer modifications. Still a lot to do, but the list is getting smaller.


Wednesday, February 4, 2015

Primed for action!


Time Machine is now 100% primed and I am now prepping to spray the Interlux Perfection final coat.  As I get another step closer comes the realization of all the steps to go. As I have said before, this has been a lesson in patience, perseverance and sometimes shear determination on those days when I am so tired from work, that the last thing I want to do, is more work, but then I rally myself, and jump into the project with the knowledge that my war of attrition will be over soon enough and then the real fun will begin,,,, but, if you want to know the truth, the real fun began with the first thought of building my own boat. The boat is still a ways off from being on the water, but in my mind I am already practicing my jibes.


Saturday, November 22, 2014

Bottoms up! or over?

The bottom is faired and I rolled on two coats of Interlux Primekote primer on the bottom and sides. I like the Interlux products so far and have decided to use their products exclusively thruout the rest of the build.


I was able to flip the boat over with the help of my son Jordon, Jay Fullwider and Tim Osborne, Tim has purchased a set of plans and will be using my build cradle to start on Colorado i550 #2.

 Hindsight is always 20/20 or so I have been told, if I was to do this again I would have completed my keel and keel sleeve and installed the keel sleeve before I turned the boat over the first time, this would have allowed me to prime and 100% finish the boat bottom with only one turn of the hull, and would have saved some time.

Carpet pad on the driveway worked well in preventing any scratches during the flip. Time Machine is now upright and ready to have the topsides finished.

Sunday, October 19, 2014

Catching up,,,, and my first race on an i550.

I will try to catch everyone up on my progress. Allot has been going on since my last blog, I am nearly finished fairing the bottom and am planning to give the boat one prime coat, then flip the boat back over and finish the keel sleeve and install it in the keel trunk, then flip the boat over and touch up anything necessary and then prime and finally paint.


These photos are of me racing in Bellingham Washington on an i550 for the first time. It was an awesome experience, the other i550 owners were great group of people, competitive and fun to hang out with.
The boat felt good, upwind was predictable due to the short waterline, but as soon as you turn around the upwind mark you a rewarded with a fun downwind run that always seemed to go by way to fast for me (I like downwind rides). Here is my report after the race :Racing report from Bellingham Washington. I flew to Washington to finally get my eyes on an i550 in person before I head into paint on my boat. The internet photos truly don’t give these boats justice. 

I was excited to see the boats sitting in the parking lot on their trailers, the PDX boats were very clean, well thought out boats with carbon rigs and new North sails. I was sailing on Michael France’s aluminum masted boat that he readily describes as “cobbled together” with older used Melges 20 sails. 

Here are some things I took away from the weekend.

1- The i550 owners and crew were very welcoming and the camaraderie/hospitality was awesome.
2- As several people have said on here, the boats are very evenly matched and spars, sails, bulb shape/weight, really didn’t seem to make a difference,, tactics and sail handling did, (you make a mistake, the other boats are going to capitalize on it).
3- Upwind was a little slower due to the short waterline, I am happy to report, that even in moderate chop, the boat was surprisingly dry (dryer then a U20 in the same conditions). Being as I have sailed bigger boats all these years (20'-50’) hiking was a new experience for me, the next thing I am making for the boat, is a hiking bench for my office.
4- Downwind is where you will fall in love with these boats, spinnaker up, pole articulated to windward and like Tokyo Trash likes to say “drive her deep she loves it”…When the wind was up the bow wanted to dig in, and you have to get your weight to the back of the boat and hike, and the boat pops onto a quick plane,,,, great fun indeed.
5- If you are building, or thinking of building a boat you owe it to yourself to make the trip and visit the North West fleet, I came away from the weekend with several new ideas on how I want to rig my boat and a pretty clear vision of how I want to finish it.

Thanks again to Michael France for inviting me to sail with him, I appreciated the hospitality/knowledge/experience he was happy to share with another i550 owner. Giving me the trophy at the end of the regatta was a huge bonus, and will always make my first i550 regatta a great experience.

My sailing buddy's Randy and Lisa Shelton made two videos of the boat build for me, the first video is about the kayak build and leads into the i550   https://www.youtube.com/watch?v=9yN2V-HIpl4

The second video is all about the i550 and was taken at mid build.   https://www.youtube.com/watch?v=AbdBLk71cMw

I would also ask you to go on Randy's Colorado Coconut Channel on utube https://www.youtube.com/user/ColoradoCoconuts . There are many cool videos they have done, including several national events. I might be a little partial to the U20 nationals video as I was racing on Juiced with my good friends Jim Ulatowski and Roy Burley.

Monday, July 7, 2014

Flipping her over

 Time Machines first trip out of the garage, Jordon, Jeramy, and Ashley were on hand to help flip her over.
 The floor of the cockpit is huge 4'4" X 8'5"....  The shortened cockpit seats will assure that you are always hiked out when the air is up, but the huge cockpit floor will give you plenty of comfortable spots for those light air races. I am going to install EVA foam to the seats, floor and foot bensons to spoil the crew (EVA foam is like the foam you see on paddle boards).
 LESSONS learned along the way:    I have been using an assortment of foam durablock long boards, and had been using 80 grit to fair with, as 80 grit was the lowest grit PSA paper I could find locally, even from the big auto body/woodwork shops,,,, after many days of sore shoulders and unnecessary extra sanding, I found 40 grit PSA (rhynostick rolls) online at Eastwoods   http://www.eastwood.com , and man did it kick my sanding into high gear,,,, the deeper scratches the heavier grit left behind were easily taken out with 80 grit paper after I was happy with the fairing of the west 410 filler. I also followed west systems advice and applied 3 coats of unthickened epoxy over the top of the microlight, all scratches were filled nicely and evenly. Note: do not sand into the fiberglass fibers, this is just to get the high spots in the fairing filler down in a hurry.
 Jeramy,,, our bowman for this maneuverer.

Now to push her back into the garage and get working on the bottom.

Saturday, May 24, 2014

I get by with a little help from my friends.


I am getting some much needed help on time machine. 

Jordon and Jeremy have been helping on some fairing, you put a 250 lb National Rugby Champion on a sander, and the dust just seems to fly.
(jeremy just got a teaching job in AZ, and is planning to build his own kayak in the near future)...


Not only am I receiving help, but I am also giving some myself. This is a spinnaker pole, cowling I am rebuilding, off a friends U20, that broke on us in last weekends regatta, despite the failure we were able to improvise and go wing on wing with the jib and still get a 2nd place for that race.

Things are finally heating up in the shop where I can finalize a few things on the kayak. Building the kayak gave me the confidence that I could build a sailboat.

Sunday, April 27, 2014

Still plugging!

Still plugging away, the lead has been poured and went well using a turkey fryer to melt the lead. I used less then 1 propane tank (I had an extra tank standing by just in case) the recycled tire weights were easy to use, and as soon as the lead melts the steel clips rise to the surface of the pot, to be whisked away by my $5.00 stainless steel slotted spoon.

If I were to do it again.... I would put two large 3" holes in the mould, to fill the bulb from, maybe tilt the bulb to each side to fill the ends, then pour the middle with the bulb level. I ran out of tire weights and had a small void to fill the next day.

I am using my limited time multi tasking, fairing the deck and cockpit, pouring the bulb, building a carbon fiber tiller, and planing a 3” wide strip down both sides of the keel, for the (5) layers of 3” wide unidirectional carbon fiber, followed by more fairing and filling. (I have been trying to convince my fitness minded friends, that sanding with a longboard is the next cross fit rage,,,,, but no one is buying it)….

I am continuing with the mindset, that if I keep a little momentum going, even small things, will eventually be big completed items.

                                         Jordon helping his dad out.
                                                   The bulb fresh out of the mold.

                            The dado for the five layers of unidirectional carbon fiber.
                     Here at the shop we do allot of scientific testing to assure quality control,,,, after jumping up and down on the keel,,,, it seemed like the perfect photo op of me hanging ten. Some test panels we get a little more scientific,,, and break out the sledge hammers to test their strength.
Might be a habit forming, here is another photo hanging ten, this time on a skate board, down the side of the main hull of a 43' Dick Newick designed Tri-Maran.

Tuesday, March 11, 2014

Plugging Away!

I am plugging away on "TIME MACHINE",,, the keel plug that is. As is the case with many of the parts on this build, and to prevent slowing things down, or just overthinking it, sometimes, you need to just roll up your sleeves and dive right in. We will get started on building an aerodynamic, 165 pound, torpedo shaped chunk of lead, but first we have to make a fake male plug in order to build a concrete female mold, to pour the lead male bulb,,,, I agree,,, a lot of steps.

 I lofted my bulb parts on paper per the plans, I then glued the paper cutouts to 2" building foam, and cut them out on my bandsaw (you could also cut them with a sheetrock hand saw). I had pre-drilled a 1/2" hole, to thread them onto a hardwood dowel, spray adhering each layer together as I went.
 I planed/faired all of this to my control marks, to achieve my final bulb shape. I started my first cote using bondo (an automotive body filler), but decided to change to 20 minute sheetrock mud, as it is easier to apply and sand.
 When I was happy with my fairing job, I painted the bulb with some leftover paint to seal the sheetrock mud. I then coated the plug with wax, and then neatly wrapped the entire plug with (1) layer of saran wrap, waxing the outside of the saran wrap also.
 I mixed and poured the concrete into my pre-built box, then pushed the bulb in place, holding it in position against its buoyancy (about 1/2 its profile) using a couple of wood scraps and screws. I let this dry overnight, leaving the keel bulb in place I added my next box directly over the lower frame. (I had used tongue and groove siding scraps, so it was easy to lock the two frames together).
 I added a couple of plumbing pipes to create pour/vent holes for the lead (pic above).
 The finished mold.
I was pleasantly surprised with a very fair mold. I plan to let this cure for a couple of weeks, before pouring the 165 pounds of lead. I am hoping that by allowing the moisture to evaporate from the concrete, that I will be able to get multiple pours out of the same mold?, although I am not 100% sure if it will, but it would be nice to help out another boat builder, by sharing the mold.

Note: I got all my lead , by going to a few tire shops, when I told the owners what I was trying to do, they were enthusiastic to help out. It is also a great way to recycle those old tire weights.